 Once you've taken a photograph, you're only halfway done with the process. Making your photos look their best requires a bit of post-production work. There are many things that can be fixed or fine-tuned, including exposure, white balance, color saturation, contrast, and noise removal, but today we'll just look at two basic things that should be done to EVERY photo: leveling and cropping. Doing these two basic steps will help your images take a giant step from amateur snapshot to professional-looking photo.
I use Photoshop or Photoshop Elements, but you can do these basic steps with any photo-editing software. The mechanics of how to do it vary by the program used — the important thing is to learn how to do it with your software, then incorporate the process into the workflow for every photo you take.
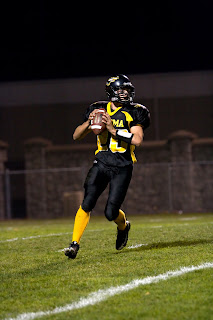
Although I'm using a sports photo as an example, the basic guidelines apply to most types of images involving people (as well as pets and objects). The top photo is uncropped, straight from my camera. It was taken from the sidelines at a high school football game.
Start by straightening the photo. A dead giveaway of an amateur photo is a horizon that's tilted or an object in the background that should be vertical (doorway, light pole, etc.) that's leaning at an angle. (Yes, there are times when you can tilt a photo at an angle for artistic/dramatic effect, but 95 percent of the time the photo should be straight.) Find an element in the photo that's supposed to be vertical and rotate the image until that object is indeed vertical. This is especially important if there's a body of water in the background: Make sure it's level! Tilted water looks funny, like it should be running out of the side of your photo.
In the top photo, notice that the image is leaning to the left. You might not notice it in looking at the player, but look at the wall in the background: The pilasters are tilting, as are th
e visible posts in a chain-link fence.
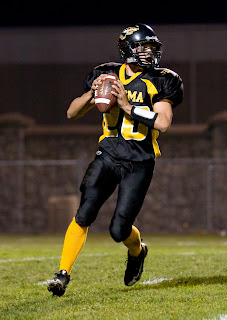
Next, crop the photo. Most people leave photos too loose, with excess dead space (or distracting clutter) around the subject. In this football photo, the subject is the quarterback. There's no reason to show any more of the background than necessary. The middle photo has been straightened, then cropped tightly around the entire player. Leave enough room for the subject to "breathe" on all sides — the crop should be tight, but not so tight that the subject is bumping the edges. If you're planning to print the image, allow space for a frame, then be sure to crop the photo to the proper ratio at which you'll be printing (a 4 x 6 requires different cropping than a 5 x 7 or 8 x 10).
I tried a tighter crop in the bottom example. When cropping a person, don't cut them off at a joint: cutting
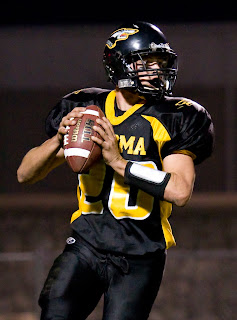 someone off at the knees or an arm at an elbow looks awkward. Also, don't crop off extremities: don't cut off someone's hand or foot. If you've accidentally cut off part of a foot when taking the photo, crop the photo tighter (mid-calf or mid-thigh) to give it a better look.
Cropping is a key reason why you should always, Always, ALWAYS shoot at your camera's highest-quality image setting. (Memory is cheap: Buy bigger memory cards, and store images on your computer and external drive, not your camera ... but that's a post for another day.) If you shoot at the top-quality setting, you can crop a photo tightly and still get a sharp, clear image. If you're using the low-quality setting, cropping tightly will result in an image that looks fuzzy and starts to show pixels.
Basic post-production work will do wonders for your photos — I do at least some editing on 99 percent of the photos I take. The more you use your image software, the more comfortable you'll become, and the quicker and more efficient you'll be when using it.
Tech info: Canon XTi, Canon 70-200mm f/2.8L lens; ISO1600, 1/320, f/2.8, ambient lighting.
No comments:
Post a Comment