Tuesday, November 2, 2010

Selective color

My last post showed an example of a black-and-white image. This time we're looking at a photo with selective color — that is, the photo is mostly black-and-white, but with part of the photo in color.

Selective color is a hot-button issue with many photographers. Some say it should never be used; others think it's OK if used sparingly, and only if the effect works with a given photo. Still others think it's a great effect, and use it all the time. I'm in the middle camp: I think the effect can be striking if used judiciously, but I've found few photos where it truly works well. However, I've had many clients ask for it, and I have a hard time NOT doing it if someone is specifically looking for it.

The above photo highlights one example, showing the start of a cross-country race. I wanted to highlight the runners from one team only, and in the color image the runners blended in with the rest of the spectators and scenery — it was a gray day, and their dark blue uniforms really didn't stand out. You can judge for yourself whether or not you like the effect in this case (if you don't like it, that's OK — I won't be offended!).

Here's a basic tutorial on one way of doing it (I used Photoshop Elements; other photo software will work in similar fashion). First, save a copy of the image to work on (NEVER work on the original). Adjust the lighting, exposure, white balance, and other settings as needed on the color image. Next, create a duplicate layer (so that you have two identical layers). Select the top layer and convert it into a black-and-white image (see my earlier post on that).

Now, using the eraser tool on the B&W layer, go over all of the areas that you want to be in color. As the eraser takes away the B&W layer, the color layer will show through. Use the hard-edge icon for sharp lines, and use the brush or airbrush icon for feathered edges (such as hair). It takes a bit of time, but the process is not difficult.

If you like the effect, give it a try. Keep in mind that it will work better on some images than others—if it's not working for you, try another image.

Tech info: Canon 7D with Canon 70-200 f/2.8L lens and 1.4 teleconverter (at 280mm, f/4.0, 1/1000, ISO 400) on a cloudy early afternoon.

Wednesday, June 9, 2010

Black and white


Black-and-white photographs are fun to create, as they can often capture drama and mood that is sometimes lacking in color images. What makes a good B&W image? That's too subjective to define. Key elements can include dramatic lighting, enhanced textures, and overall mood.

Converting a digital color image to B&W is, on one hand, easy — Photoshop and other software programs allow doing it in a single step with the click of a mouse. However, getting a GOOD B&W image is more involved. Almost all images require additional work to before they are ready to display. Some consider this digital manipulation to be cheating, but I disagree — the methods are merely an on-screen way of accomplishing various darkroom techniques that have long been practiced by photographers who work with film and photo paper.

The key to black-and-white photography and processing is that instead of managing color, we are now managing and controlling light. When taking a photo, you must be very conscious of your exposure, the type and angle of light, how the light is hitting your subject, and how the background and foreground are lit.

There are many methods of making a black-and-white digital image. I'm not going to claim that my techniques are the best, but I've broken it down to a workflow with which I'm comfortable and familiar. To start with, I always shoot color digital files in RAW format. Here's what I do using Photoshop Elements: I begin by choosing the "convert to black and white" command under the "Enhance" tab. This function has several preset styles, each of which will provide a different look to the photo. I try each of these presets to get the photo into the ballpark of what I'm looking for. Sliding control buttons for each color channel (as well as the contrast) allow fine-tuning the image. You can further adjust the overall contrast and brightness using "Levels" by sliding the buttons for the input and output functions. To darken or lighten select areas of the image, use the "burn" and "dodge" tools.

The above image of a soccer goalkeeper was taken with a telephoto lens with the aperture wide open. This provided the bokeh — the nicely blurred background that helps make the subject stand out. I converted the image to B&W as above, using the "portrait" presets but adjusting the red and contrast channels to add contrast (making the blacks blacker and the lights lighter). I then used the burn tool to darken the background and to soften the sunlight on her face and jersey. I cropped the image on the right to eliminate a car in the background, and left the net in place on the left side to provide context for the photo.

A couple of tips: Remember to always work on a copy of an image — never alter the original. Also, do all of your work with the image as a Photoshop or TIFF file. Only save it as a JPG when you're done. Working on a JPG and repeatedly opening, saving, and closing it will downgrade the quality of the image.

There's no hard-and-fast rule in creating B&Ws. Depending upon the type of image (landscape, portrait, sports, etc.), you may want a soft look or a hard, contrasty appearance. In general I try to make sure that the image has a full range of tones from pure black to pure white. Make sure that faces and other skin areas have a variety of tones and aren't blown-out white. Also, try various crops for different effects.

Some images lend themselves well to B&W, but many don't. Some photographers fall in love with black-and-white images to the point of converting ALL of their images to B&W. Instead, try converting some photos to black and white. Play with different methods and settings, and look at your work with a critical eye. If the effect doesn't work for one photo, don't feel bad — just delete the file and move on to another one.


Tech info for soccer shot: Canon XTi with Canon 70-200 f/2.8L lens and 1.4x converter (shot at 250mm), at 1/2000, f/4, ISO 200.

Wednesday, March 24, 2010

The eyes have it

It’s certainly possible to take good sports photographs that don’t show faces, but if you want to truly capture the personality of an athlete, it’s vital to show the face, and most importantly the eyes. It's an old proverb that the eyes are the windows to the soul, and sports is no exception to the photography maxim that if you can capture the eyes, then your image will reflect the personality of a subject.

With sports, the eyes not only reflect the personality of the athlete in the photo, they—and the rest of the face—can also show the mood or feeling of the moment, whether it be excitement, hope, tension, happiness, intensity, or fear.

The key to photos like these is getting in as tight on the face as possible, which means using a long lens. I used a DSLR with a 70-200mm f/2.8 lens for all of these shots, zoomed all the way to 200mm for most.

In post-processing I cropped in even tighter on them to emphasize facial expressions (see my earlier blog entry on cropping). With the action paused, you can also get away with slower shutter speeds than with action (down to 1/250 or 1/200 if necessary).

It’s difficult to do this during action while keeping the subject in focus. You’ll find it easier if you wait for pauses in play: free throws in basketball, the moment before the snap in football, a batter waiting for a pitch in baseball or softball. This also allows those with slower lenses (or point-and-shoot cameras) an opportunity to get a tight shot as well. Be aware of your vantage point: Find a spot where you can see faces clearly, and get as close to the court or field as possible.

Normally when shooting action you should use AI Servo focusing (Nikon: Continuous Servo AF) to keep the subject in focus as he or she moves.

However, for shots like these, where the action is paused, a quick change to standard one-shot AF will work best. Use center-point focusing and aim at an eye—it’s the most critical element to be in focus. You can also use manual focus to make final adjustments (if you’re good at it ... which is difficult in these situations). Take several shots if possible, as it’s amazing how much the facial expression can change over a span of just a second or two.

As always, the more photos you shoot, the more keepers you’ll get. Zoom in, stay steady, and capture some great faces.

Tech info: Canon XTi with Canon 70-200mm f/2.8L lens; all at f/2.8 (various shutter speeds depending upon lighting).


Thursday, January 14, 2010

Get low to increase drama


Adding feelings of drama, size, and strength to sports photos can make the difference between a snapshot and a powerful photograph. One of the best techniques for creating a dramatic sports image is to get as low as possible when taking the shot. Getting low and looking up at your subject makes the subject loom large in the photo. This is especially true when photographing youth sports. Here are photos from two high school games to illustrate the idea.

For the baseball shot, I kneeled behind the chain-link backstop screen, which was about 30 feet behind home plate, and to the left of the batter. By placing the front of the lens directly against the fence (with my fingers between the fence and lens to protect the lens glass), the chain-link disappears. The camera was just over two feet off of the ground. The final effect emphasizes that the pitcher is throwing down off the mound toward the camera. Keeping the aperture wide open blurs the background, focusing the attention on the pitcher.

To take the basketball shot, I sat on the floor about six feet from the endline and just to the left of the basket. I used manual focus, prefocusing on a point about 10 feet into the court from the baseline. I then placed the camera on the floor and tipped it upward to capture the view. This technique takes some practice, because I was shooting blind. A couple of test shots helped figure out the angles. (In cases like this, especially with a wide-angle lens, the autofocus would be more likely to lock on a background subject.)

Both photos were cropped after shooting (as described in an earlier post). I tried a couple of crops on the basketball photo before settling on this view — including the ball and basket emphasized the dramatic upward angle more than a shot that was cropped around the players only.

These principles can apply to other types of photos as well, including portraits and other types of action shots. Experiment with them, and don't be afraid to get down on the ground.


Tech info: Basketball: Canon XTi, Canon 28mm f/1.8 lens, 1/400 sec., f/2.5, ISO 1600.
Baseball: Canon XTi, Canon 70-200 f/2.8L lens, 1/1600 sec., f/2.8, ISO 100.

Tuesday, January 5, 2010

Panning

Adding motion blur can be a great way to give a dynamic feel to a photo, creating the feeling that the subject is really moving. A common technique for doing this is by panning the camera, which simply means moving the camera to follow the motion of the subject while depressing the shutter button. It can work for almost any moving subject, such as cars, trains, and athletes.

The key is to choose a shutter speed that's slow enough to blur the stationary part of the scene, yet fast enough to allow you to sharply capture the subject itself. As an example, in the photo above, the train was moving at about 60 mph from left to right. I chose a shutter speed of 1/25 of a second and adjusted the aperture for a proper exposure. As the train approached, I focused on the cab and moved the camera to follow it. I held down the shutter to take several shots as it passed; this image was the best of a five-shot sequence. I used a DSLR for this, which gives the advantages of faster focus, quicker shutter response, and the ability to take several shots per second. You can do this technique with a point-and-shoot as well, but you'll probably only be able to get off one shot per pass, and the focus won't be as accurate.

If you're hand-holding the camera, rotate your entire upper body (not just your head) as you follow the subject. You'll be more stable, and you'll be able to more accurately track the subject. You can also do this on any tripod that has separate pan and tilt controls. Loosen the pan lock and smoothly turn the camera to follow the subject.

If you're using a DSLR, choose AI Servo (Canon) or Continuous Servo AF (Nikon) focusing whenever you shoot a moving subject. These allow the focus to continually track a moving object up to the point of shutter release as long as the shutter button is depressed halfway. If you use standard autofocus, keying the shutter button halfway locks the focus at that point — the delay between when the focus locks and when the shutter is released will often let the subject move out of focus range.

Also, turn off Image Stabilization (IS, Canon; Nikon calls it VR for Vibration Reduction) whenever you're shooting moving objects. Remember that IS does nothing to help freeze a moving subject: It only helps cancel out movement by the camera.

At least one area of the image should be in sharp focus: the cab on the diesel locomotive above, or the face if you're photographing a person. If everything in the photo is blurred or out of focus, the motion effect is lost — hit the delete button and try again.

It often takes several attempts to get a good image. Don't be discouraged if your initial efforts aren't what you had hoped: Keep shooting, and eventually you'll wind up with some "wow!" shots with this technique.

Tech info: Canon Digital Rebel, Canon 24-85mm lens, 1/25 second. Eastbound Union Pacific freight train, somewhere in Nebraska along U.S. 30.

Monday, December 21, 2009

Crop, crop, crop ...

Once you've taken a photograph, you're only halfway done with the process. Making your photos look their best requires a bit of post-production work. There are many things that can be fixed or fine-tuned, including exposure, white balance, color saturation, contrast, and noise removal, but today we'll just look at two basic things that should be done to EVERY photo: leveling and cropping. Doing these two basic steps will help your images take a giant step from amateur snapshot to professional-looking photo.

I use Photoshop or Photoshop Elements, but you can do these basic steps with any photo-editing software. The mechanics of how to do it vary by the program used — the important thing is to learn how to do it with your software, then incorporate the process into the workflow for every photo you take.

Although I'm using a sports photo as an example, the basic guidelines apply to most types of images involving people (as well as pets and objects). The top photo is uncropped, straight from my camera. It was taken from the sidelines at a high school football game.

Start by straightening the photo. A dead giveaway of an amateur photo is a horizon that's tilted or an object in the background that should be vertical (doorway, light pole, etc.) that's leaning at an angle. (Yes, there are times when you can tilt a photo at an angle for artistic/dramatic effect, but 95 percent of the time the photo should be straight.) Find an element in the photo that's supposed to be vertical and rotate the image until that object is indeed vertical. This is especially important if there's a body of water in the background: Make sure it's level! Tilted water looks funny, like it should be running out of the side of your photo.
In the top photo, notice that the image is leaning to the left. You might not notice it in looking at the player, but look at the wall in the background: The pilasters are tilting, as are th
e visible posts in a chain-link fence.

Next, crop the photo. Most people leave photos too loose, with excess dead space (or distracting clutter) around the subject. In this football photo, the subject is the quarterback. There's no reason to show any more of the background than necessary. The middle photo has been straightened, then cropped tightly around the entire player. Leave enough room for the subject to "breathe" on all sides — the crop should be tight, but not so tight that the subject is bumping the edges. If you're planning to print the image, allow space for a frame, then be sure to crop the photo to the proper ratio at which you'll be printing (a 4 x 6 requires different cropping than a 5 x 7 or 8 x 10).

I tried a tighter crop in the bottom example. When cropping a person, don't cut them off at a joint: cutting
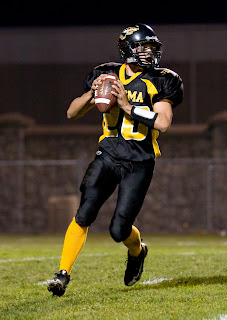
someone off at the knees or an arm at an elbow looks awkward. Also, don't crop off extremities: don't cut off someone's hand or foot. If you've accidentally cut off part of a foot when taking the photo, crop the photo tighter (mid-calf or mid-thigh) to give it a better look.


Cropping is a key reason why you should always, Always, ALWAYS shoot at your camera's highest-quality image setting. (Memory is cheap: Buy bigger memory cards, and store images on your computer and external drive, not your camera ... but that's a post for another day.) If you shoot at the top-quality setting, you can crop a photo tightly and still get a sharp, clear image. If you're using the low-quality setting, cropping tightly will result in an image that looks fuzzy and starts to show pixels.

Basic post-production work will do wonders for your photos — I do at least some editing on 99 percent of the photos I take. The more you use your image software, the more comfortable you'll become, and the quicker and more efficient you'll be when using it.

Tech info: Canon XTi, Canon 70-200mm f/2.8L lens; ISO1600, 1/320, f/2.8, ambient lighting.


Tuesday, December 8, 2009

Not the usual team shots ...

I had some fun shooting basketball team photos last week. It's easy to fall into a trap when taking team group shots: Line 'em up in two rows and hit the shutter release. However, if the players are enthusiastic, there are many other cool images to be had. For youth teams—when it can be like herding cats to get them in order for a "formal" group shot—telling them they can do a couple of goofy shots AFTER they do the standard shot can get them to settle down. By high school, boys usually just want to do the normal serious shot, but girls are often not only receptive to goofy shots, they often suggest ideas.

The "circle" shot is a popular one. I stole the idea long ago after seeing a similar image online, and use it often when shooting girls' teams. I used a DSLR to shoot it, but it's a very doable with a point-and-shoot camera. To do it, get down on the floor on your back and have the players line up around you in a circle looking down. Make sure all of the players' heads are fully in view. The key to this shot is to make sure the players tilt their heads downward — if they don't, you'll be looking up a bunch of nostrils, which just doesn't work well. Make sure the camera focuses on the faces. I use manual focus to make sure the autofocus doesn't look through the middle of the group and lock on the ceiling. A room with a high ceiling works best — so the flash won't illuminate it — as you want a dark background. I also use a diffuser on my camera flash to soften the light, as direct flash can be harsh at close range. Some photo editing is also usually needed to even the lighting.

Doing a shot of goofy poses can also work well. This photo is one of my favorites of these. My directions were simple: Everybody do something different with a ball. The girls were great: they got creative and came up with their poses in a matter of seconds. I took four or five shots. Each was slightly different, and this was the best. Make sure you can see all the faces and that none of the basketballs is blocking someone's face or the light.

I think both of these work well (and were fun to shoot) because it lets the personalities of the players come through in the images, which — of course — is always the goal when photographing people.

A word on backgrounds for group shots: AVOID WALLS. (OK, that's two words, but it's important.) The wall itself (even if plain) will be distracting, and the resulting shadows directly behind players' heads are also distracting. Get into an open area, so that the background objects/walls will be darker (which directs attention on the people).

Tech info:
Circle: Canon XTi with Canon 17-40mm f/4L lens at 17mm; Canon 550EX flash with diffuser mounted on camera; f/5.6, 1/125, ISO 200.
Goofy group: Same camera/lens/settings, but at 21mm, with two tripod-mounted Canon 550EX flash units with umbrellas, one at each side.