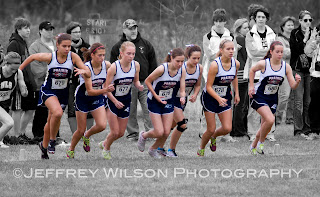
 My last post showed an example of a black-and-white image. This time we're looking at a photo with selective color — that is, the photo is mostly black-and-white, but with part of the photo in color.
Selective color is a hot-button issue with many photographers. Some say it should never be used; others think it's OK if used sparingly, and only if the effect works with a given photo. Still others think it's a great effect, and use it all the time. I'm in the middle camp: I think the effect can be striking if used judiciously, but I've found few photos where it truly works well. However, I've had many clients ask for it, and I have a hard time NOT doing it if someone is specifically looking for it.
The above photo highlights one example, showing the start of a cross-country race. I wanted to highlight the runners from one team only, and in the color image the runners blended in with the rest of the spectators and scenery — it was a gray day, and their dark blue uniforms really didn't stand out. You can judge for yourself whether or not you like the effect in this case (if you don't like it, that's OK — I won't be offended!).
Here's a basic tutorial on one way of doing it (I used Photoshop Elements; other photo software will work in similar fashion). First, save a copy of the image to work on (NEVER work on the original). Adjust the lighting, exposure, white balance, and other settings as needed on the color image. Next, create a duplicate layer (so that you have two identical layers). Select the top layer and convert it into a black-and-white image (see my earlier post on that).
Now, using the eraser tool on the B&W layer, go over all of the areas that you want to be in color. As the eraser takes away the B&W layer, the color layer will show through. Use the hard-edge icon for sharp lines, and use the brush or airbrush icon for feathered edges (such as hair). It takes a bit of time, but the process is not difficult.
If you like the effect, give it a try. Keep in mind that it will work better on some images than others—if it's not working for you, try another image.
Tech info: Canon 7D with Canon 70-200 f/2.8L lens and 1.4 teleconverter (at 280mm, f/4.0, 1/1000, ISO 400) on a cloudy early afternoon.