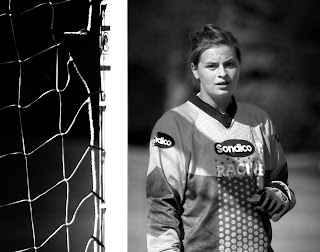
Black-and-white photographs are fun to create, as they can often capture drama and mood that is sometimes lacking in color images. What makes a good B&W image? That's too subjective to define. Key elements can include dramatic lighting, enhanced textures, and overall mood.
Converting a digital color image to B&W is, on one hand, easy — Photoshop and other software programs allow doing it in a single step with the click of a mouse. However, getting a GOOD B&W image is more involved. Almost all images require additional work to before they are ready to display. Some consider this digital manipulation to be cheating, but I disagree — the methods are merely an on-screen way of accomplishing various darkroom techniques that have long been practiced by photographers who work with film and photo paper.
The key to black-and-white photography and processing is that instead of managing color, we are now managing and controlling light. When taking a photo, you must be very conscious of your exposure, the type and angle of light, how the light is hitting your subject, and how the background and foreground are lit.
There are many methods of making a black-and-white digital image. I'm not going to claim that my techniques are the best, but I've broken it down to a workflow with which I'm comfortable and familiar. To start with, I always shoot color digital files in RAW format. Here's what I do using Photoshop Elements: I begin by choosing the "convert to black and white" command under the "Enhance" tab. This function has several preset styles, each of which will provide a different look to the photo. I try each of these presets to get the photo into the ballpark of what I'm looking for. Sliding control buttons for each color channel (as well as the contrast) allow fine-tuning the image. You can further adjust the overall contrast and brightness using "Levels" by sliding the buttons for the input and output functions. To darken or lighten select areas of the image, use the "burn" and "dodge" tools.
The above image of a soccer goalkeeper was taken with a telephoto lens with the aperture wide open. This provided the bokeh — the nicely blurred background that helps make the subject stand out. I converted the image to B&W as above, using the "portrait" presets but adjusting the red and contrast channels to add contrast (making the blacks blacker and the lights lighter). I then used the burn tool to darken the background and to soften the sunlight on her face and jersey. I cropped the image on the right to eliminate a car in the background, and left the net in place on the left side to provide context for the photo.
A couple of tips: Remember to always work on a copy of an image — never alter the original. Also, do all of your work with the image as a Photoshop or TIFF file. Only save it as a JPG when you're done. Working on a JPG and repeatedly opening, saving, and closing it will downgrade the quality of the image.
There's no hard-and-fast rule in creating B&Ws. Depending upon the type of image (landscape, portrait, sports, etc.), you may want a soft look or a hard, contrasty appearance. In general I try to make sure that the image has a full range of tones from pure black to pure white. Make sure that faces and other skin areas have a variety of tones and aren't blown-out white. Also, try various crops for different effects.
Some images lend themselves well to B&W, but many don't. Some photographers fall in love with black-and-white images to the point of converting ALL of their images to B&W. Instead, try converting some photos to black and white. Play with different methods and settings, and look at your work with a critical eye. If the effect doesn't work for one photo, don't feel bad — just delete the file and move on to another one.
Tech info for soccer shot: Canon XTi with Canon 70-200 f/2.8L lens and 1.4x converter (shot at 250mm), at 1/2000, f/4, ISO 200.