Thursday, January 14, 2010

Get low to increase drama


Adding feelings of drama, size, and strength to sports photos can make the difference between a snapshot and a powerful photograph. One of the best techniques for creating a dramatic sports image is to get as low as possible when taking the shot. Getting low and looking up at your subject makes the subject loom large in the photo. This is especially true when photographing youth sports. Here are photos from two high school games to illustrate the idea.

For the baseball shot, I kneeled behind the chain-link backstop screen, which was about 30 feet behind home plate, and to the left of the batter. By placing the front of the lens directly against the fence (with my fingers between the fence and lens to protect the lens glass), the chain-link disappears. The camera was just over two feet off of the ground. The final effect emphasizes that the pitcher is throwing down off the mound toward the camera. Keeping the aperture wide open blurs the background, focusing the attention on the pitcher.

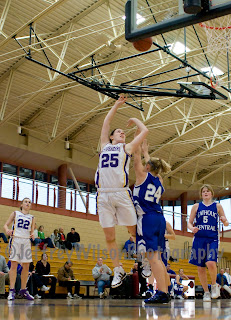
To take the basketball shot, I sat on the floor about six feet from the endline and just to the left of the basket. I used manual focus, prefocusing on a point about 10 feet into the court from the baseline. I then placed the camera on the floor and tipped it upward to capture the view. This technique takes some practice, because I was shooting blind. A couple of test shots helped figure out the angles. (In cases like this, especially with a wide-angle lens, the autofocus would be more likely to lock on a background subject.)

Both photos were cropped after shooting (as described in an earlier post). I tried a couple of crops on the basketball photo before settling on this view — including the ball and basket emphasized the dramatic upward angle more than a shot that was cropped around the players only.

These principles can apply to other types of photos as well, including portraits and other types of action shots. Experiment with them, and don't be afraid to get down on the ground.


Tech info: Basketball: Canon XTi, Canon 28mm f/1.8 lens, 1/400 sec., f/2.5, ISO 1600.
Baseball: Canon XTi, Canon 70-200 f/2.8L lens, 1/1600 sec., f/2.8, ISO 100.

Tuesday, January 5, 2010

Panning

Adding motion blur can be a great way to give a dynamic feel to a photo, creating the feeling that the subject is really moving. A common technique for doing this is by panning the camera, which simply means moving the camera to follow the motion of the subject while depressing the shutter button. It can work for almost any moving subject, such as cars, trains, and athletes.

The key is to choose a shutter speed that's slow enough to blur the stationary part of the scene, yet fast enough to allow you to sharply capture the subject itself. As an example, in the photo above, the train was moving at about 60 mph from left to right. I chose a shutter speed of 1/25 of a second and adjusted the aperture for a proper exposure. As the train approached, I focused on the cab and moved the camera to follow it. I held down the shutter to take several shots as it passed; this image was the best of a five-shot sequence. I used a DSLR for this, which gives the advantages of faster focus, quicker shutter response, and the ability to take several shots per second. You can do this technique with a point-and-shoot as well, but you'll probably only be able to get off one shot per pass, and the focus won't be as accurate.

If you're hand-holding the camera, rotate your entire upper body (not just your head) as you follow the subject. You'll be more stable, and you'll be able to more accurately track the subject. You can also do this on any tripod that has separate pan and tilt controls. Loosen the pan lock and smoothly turn the camera to follow the subject.

If you're using a DSLR, choose AI Servo (Canon) or Continuous Servo AF (Nikon) focusing whenever you shoot a moving subject. These allow the focus to continually track a moving object up to the point of shutter release as long as the shutter button is depressed halfway. If you use standard autofocus, keying the shutter button halfway locks the focus at that point — the delay between when the focus locks and when the shutter is released will often let the subject move out of focus range.

Also, turn off Image Stabilization (IS, Canon; Nikon calls it VR for Vibration Reduction) whenever you're shooting moving objects. Remember that IS does nothing to help freeze a moving subject: It only helps cancel out movement by the camera.

At least one area of the image should be in sharp focus: the cab on the diesel locomotive above, or the face if you're photographing a person. If everything in the photo is blurred or out of focus, the motion effect is lost — hit the delete button and try again.

It often takes several attempts to get a good image. Don't be discouraged if your initial efforts aren't what you had hoped: Keep shooting, and eventually you'll wind up with some "wow!" shots with this technique.

Tech info: Canon Digital Rebel, Canon 24-85mm lens, 1/25 second. Eastbound Union Pacific freight train, somewhere in Nebraska along U.S. 30.